This week I've been doing some canning again and I'm sure in the next few weeks I'll be doing even more! Last Wednesday my neighbor and some other friends got together to can pickles. This is the first time I've ever done it and it's really not hard at all! I didn't realize how simple it really is and if you like them whole it's very little prep work too. We just made dill this time, but there are plenty of mixes for other varieties as well. For the half bushel of pickling cucumbers my neighbor spend about $10 and we got 15+ pint size or quart size jars! Compared to the grocery store prices, which can be quite expensive, it was a great bargain. We did leave some whole, sliced some into circles and then sliced some length wise for "stackables". It was a great learning experience and doing it with great company made it extra fun.
Then, over the weekend we went to a local organic farm that is just up the street from us, maybe 5 minutes away. We love going there and have made it a tradition every summer since our oldest has come along. The thing that makes this farm special and extra fun is that they have huge berry patches and let you pick your own. They grow raspberries and strawberries, so we usually take home some of each. They are delicious and being that they are organic, local and fresh makes me even happier about feeding them to my family. This weekend we went with the intention of getting a good amount so we could use the berries to make jam. Typically berries are always a little bit pricier produce item, so we paid about $17 for all that we picked. This is also my first year making berry jams too. We did a peach and cinnamon preserves two years ago which was really yummy, but never just berries. It really is not difficult at all and takes very little time compared to other canning recipes. This is one I would highly recommend for a beginner. It's not overwhelming, could be done alone, takes very little prep time and can be totally finished in about 1-1 1/2 hours. Our final result was 16 jars of jam, 7 raspberry and 9 strawberry. One of my favorite things about the jams we made is that they are sugar free too. The sweeteners in them are honey and agave nectar which have a lot less negative health effects then white sugar. AND the recipe called for 3/4 C of honey/agave compared to 3 C of sugar! Great perk, right?!?!
We haven't tasted any of our most recent canning goods because both the pickles and the jam take a couple weeks to really set and get their flavor. So, I"ll be sure to post about them when we've tasted them to let you know how we like them.
Within the next few weeks we'll be doing some of my favorite canning projects: salsa and marinara. They are great money saving options throughout the year too. I'm planning on getting my ingredients at a local farmer's market that lets you fill a gunnysack (large cloth bag) full of the produce you chose for
$10! So, I'll be loading mine up with all the ingredients I need for canning that we don't already have in our garden. I'm excited!
Showing posts with label Canning. Show all posts
Showing posts with label Canning. Show all posts
Monday, August 30, 2010


Monday, August 23, 2010
Canning 101
It's the beginning of canning season for most people with summer produce needing to be used. A few years ago my husband and I decided to start canning from our garden. Our first summer canned salsa and marinara because our tomato plants produced amazingly well that year. My husband had a favorite recipe for marinara from his days of being the assistant chef at an italian restaurant in his home town. So, that's the one we chose to can. We did have to adapt it a little to make sure the acidity levels were right for canning, but that can easily be done by adding lemon juice or vinegar (you can look online for the amounts according to how much you are making). The salsa recipe we just searched for some online and picked one we thought worked well for our taste. During our garage saling days that summer we came across a sale where a lady had canned for YEARS and was getting rid of all her supplies, including her canning bath, tools, jars, extra lids, everything you need. She was selling her things for $1 a box!! AMAZING! So we spent $5 and walked away with everything we needed for that first year. After that first time, we were hooked. Now each summer we can something, usually several things and we've been trying new things each year and have really learned a lot about canning and really enjoy the process, using fresh and home grown produce, having a supply to get us through most of the year and being able to serve something healthy and fresh to our family and guests.
Of course every year we learn something new and have adapted our recipes and methods some to make things more efficient so I thought I'd share some of what we've learned with you. If there are other canners with great ideas, please fill us in too. We're always looking for better ways to do things.
*Give yourself plenty of time. Canning is not an instant project. It's something you'll want to allot a block of time to. For many canners, days/weeks are a more appropriate and realistic time frame because of the amount of recipes and produce they are canning. We usually do ours throughout the season for a day or two at a time. This is not a project you want to start at 7 or 8 o'clock one evening when you have to work the next morning. The prep work is usually the most time consuming. For recipes like salsa and marinara there is a lot of chopping involved so if you have a chopper or food processor those come in really handy. Some of that prep work can also be done the day before if you need to spread thing out over a couple days.
*Have a partner or two is helpful during several stages of the canning process. If you have someone to help you, take them up on that offer!
*Blanching-this is a process that helps preserve nutrients in your produce and is also a method of removing skin from things like tomatoes, peaches, pears, etc. The general idea is that you boil them for a few minutes and immediately put them into ice water. The skin will be cracked and easy to just peel off your with your hands.
*Once you have your ingredients prepped, you are ready to start cooking. Depending on what you're making it could be just a few minutes, but most things need to boiling for a set amount of time to ensure it is safe and healthy and preserved correctly.
*While you are cooking your food you should have your jars and lids boiling in a large pot to sanitize them and prepare them for the food.

* About the time your food is about ready to pour into your jars, you'll need to get your jars out and on the counter with a funnel. Pour your food into your jars allowing for the amount of space required for your recipe. Wipe the lid with a paper towel to make sure there isn't any food interfering with the seal of the lid. Place your lid (that was boiling) on there and lightly screw on the band.
* Processing the food- each recipe requires a certain amount of processing (boiling) time in your pot according to your altitude, size of jars and ingredients. All that can be looked up in your canning recipe or online. It needs to be completely submerged and standing straight up. You'll need a rack or something on the bottom of the pot to keep the jars from touching the bottom of the pan.
*After you have boiled your jars for the amount of time needed you pull them out of the pot using the special tools for grabbing jars. Put them in a place on the counter where they can cool and usually after about 12 hours you can make sure the seal worked (the lid won't pop any more). If it did, you're all done and you can store things for later. If not, you'll have to re-process the jars that didn't seal.

During the cooking and canning, you have several things going on at once which is why a partner is helpful to help make sure you don't miss a step and things are ready when you need them. Some of the more simple canning recipes are fruit and jams. There isn't as much to prep or cook, so if you want to start with something that is less overwhelming that would be my suggestion. You can usually find a jam recipe right on the back of a box of fruit pectin (found in the canning isle, used to preserve fruit and an ingredient in jams).
If you give it a try let me know how it goes! Also, if you have done canning before and have other tips, fill us in on that too.
Of course every year we learn something new and have adapted our recipes and methods some to make things more efficient so I thought I'd share some of what we've learned with you. If there are other canners with great ideas, please fill us in too. We're always looking for better ways to do things.
*Give yourself plenty of time. Canning is not an instant project. It's something you'll want to allot a block of time to. For many canners, days/weeks are a more appropriate and realistic time frame because of the amount of recipes and produce they are canning. We usually do ours throughout the season for a day or two at a time. This is not a project you want to start at 7 or 8 o'clock one evening when you have to work the next morning. The prep work is usually the most time consuming. For recipes like salsa and marinara there is a lot of chopping involved so if you have a chopper or food processor those come in really handy. Some of that prep work can also be done the day before if you need to spread thing out over a couple days.
*Have a partner or two is helpful during several stages of the canning process. If you have someone to help you, take them up on that offer!
*Blanching-this is a process that helps preserve nutrients in your produce and is also a method of removing skin from things like tomatoes, peaches, pears, etc. The general idea is that you boil them for a few minutes and immediately put them into ice water. The skin will be cracked and easy to just peel off your with your hands.
*Once you have your ingredients prepped, you are ready to start cooking. Depending on what you're making it could be just a few minutes, but most things need to boiling for a set amount of time to ensure it is safe and healthy and preserved correctly.
*While you are cooking your food you should have your jars and lids boiling in a large pot to sanitize them and prepare them for the food.

* About the time your food is about ready to pour into your jars, you'll need to get your jars out and on the counter with a funnel. Pour your food into your jars allowing for the amount of space required for your recipe. Wipe the lid with a paper towel to make sure there isn't any food interfering with the seal of the lid. Place your lid (that was boiling) on there and lightly screw on the band.
* Processing the food- each recipe requires a certain amount of processing (boiling) time in your pot according to your altitude, size of jars and ingredients. All that can be looked up in your canning recipe or online. It needs to be completely submerged and standing straight up. You'll need a rack or something on the bottom of the pot to keep the jars from touching the bottom of the pan.
*After you have boiled your jars for the amount of time needed you pull them out of the pot using the special tools for grabbing jars. Put them in a place on the counter where they can cool and usually after about 12 hours you can make sure the seal worked (the lid won't pop any more). If it did, you're all done and you can store things for later. If not, you'll have to re-process the jars that didn't seal.

*I forgot to add the funnel to this picture, you really should have one on hand for canning.
During the cooking and canning, you have several things going on at once which is why a partner is helpful to help make sure you don't miss a step and things are ready when you need them. Some of the more simple canning recipes are fruit and jams. There isn't as much to prep or cook, so if you want to start with something that is less overwhelming that would be my suggestion. You can usually find a jam recipe right on the back of a box of fruit pectin (found in the canning isle, used to preserve fruit and an ingredient in jams).
If you give it a try let me know how it goes! Also, if you have done canning before and have other tips, fill us in on that too.
Thursday, August 19, 2010
All things apple
Do you have a supply of large kitchen appliances that take up half your kitchen space and seem to be used just a few times a year? Well, yesterday I put nearly all of them to work! I'm sure today and tomorrow they'll be getting used too.
Yesterday afternoon I spent a lot of time cooking! I had bought a large box of organic apples (I think around 30lbs) for $30 and they were needing to be used. Of course we weren't going to be eating 30lbs of apples in the next couple days, so I made an apple canning list. The thing I love about fruit is that you can make so many great things out of them. This year we decided to make juice (we have a juicer--one of those big appliances I mentioned), apple cider (my husband's idea, which I like), applesauce, apple butter (but that might not make the cut after all), canned apples (for baking cakes, pies, etc). I'll also have all the apple pulp from the juicer to use for baking muffins, breads and cakes frozen for future use. Well, all that meant I had to do some serious amount of cleaning, chopping, cooking, and canning to do.
A few days ago I juiced about 20 or so apples and that juice was in the fridge waiting to be finished or made into apple cider. So yesterday, I dealt with that by draining the chunks and putting it in freezer bags to pull out when we are running low on juice. It's basically the frozen concentrate idea because we'll have to dilute it with some water before using it too. I also juiced about another 20-30 apples, drained it and froze it to make into apple cider maybe today or tomorrow.

After cleaning up that mess and picking out all the "really ready to be used" apples that were still left I got to work on applesauce. How did we ever know how to do things before google? I had no idea how to make homemade applesauce or how to can it, so I did what most people do and googled it. Here is the recipe I found. Basically, you wash and slice your apples, put 1/2 inch of purified water or apple juice in the bottom of a stockpot and boil them until they become really soft.



Yesterday afternoon I spent a lot of time cooking! I had bought a large box of organic apples (I think around 30lbs) for $30 and they were needing to be used. Of course we weren't going to be eating 30lbs of apples in the next couple days, so I made an apple canning list. The thing I love about fruit is that you can make so many great things out of them. This year we decided to make juice (we have a juicer--one of those big appliances I mentioned), apple cider (my husband's idea, which I like), applesauce, apple butter (but that might not make the cut after all), canned apples (for baking cakes, pies, etc). I'll also have all the apple pulp from the juicer to use for baking muffins, breads and cakes frozen for future use. Well, all that meant I had to do some serious amount of cleaning, chopping, cooking, and canning to do.
A few days ago I juiced about 20 or so apples and that juice was in the fridge waiting to be finished or made into apple cider. So yesterday, I dealt with that by draining the chunks and putting it in freezer bags to pull out when we are running low on juice. It's basically the frozen concentrate idea because we'll have to dilute it with some water before using it too. I also juiced about another 20-30 apples, drained it and froze it to make into apple cider maybe today or tomorrow.

This was about the half way point in the box!

This was probably about half the amount I used being washed.

Ready to boil/steam for a while.
After they are cooked you pour your apples into a food processor until it's smooth or the consistency that you like. Pour it back into the pan to keep it warm and add cinnamon to taste. I used one tablespoon and that was perfect for us. That's it, applesauce made. :)

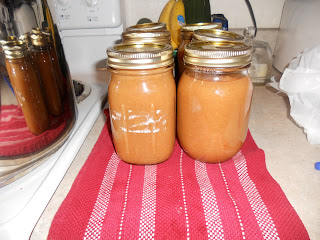
Then, we went through the canning process and now have 6 pints of applesauce for our pantry.

That's a really nice final result from your hard work isn't it? And then there is this...

the mess you made waiting for you at the end! That's my least favorite part, but it'll be worth it to have so many great things on hand that are healthy, free from preservatives, extra sugars/salts, and unnecessary packaging.
Not bad for a box of organic apples, right? So far we have apple pulp for baking at least several baked goods, several jugs of juice, a few jugs of apple cider (almost done), 6 pints of applesauce and another ?? pints of canned apples (still need to finish). The other cool part is that for nearly all of these things, other then some water and some seasonings, I haven't used any other ingredients!
Subscribe to:
Posts (Atom)
