This week I've been doing some canning again and I'm sure in the next few weeks I'll be doing even more! Last Wednesday my neighbor and some other friends got together to can pickles. This is the first time I've ever done it and it's really not hard at all! I didn't realize how simple it really is and if you like them whole it's very little prep work too. We just made dill this time, but there are plenty of mixes for other varieties as well. For the half bushel of pickling cucumbers my neighbor spend about $10 and we got 15+ pint size or quart size jars! Compared to the grocery store prices, which can be quite expensive, it was a great bargain. We did leave some whole, sliced some into circles and then sliced some length wise for "stackables". It was a great learning experience and doing it with great company made it extra fun.
Then, over the weekend we went to a local organic farm that is just up the street from us, maybe 5 minutes away. We love going there and have made it a tradition every summer since our oldest has come along. The thing that makes this farm special and extra fun is that they have huge berry patches and let you pick your own. They grow raspberries and strawberries, so we usually take home some of each. They are delicious and being that they are organic, local and fresh makes me even happier about feeding them to my family. This weekend we went with the intention of getting a good amount so we could use the berries to make jam. Typically berries are always a little bit pricier produce item, so we paid about $17 for all that we picked. This is also my first year making berry jams too. We did a peach and cinnamon preserves two years ago which was really yummy, but never just berries. It really is not difficult at all and takes very little time compared to other canning recipes. This is one I would highly recommend for a beginner. It's not overwhelming, could be done alone, takes very little prep time and can be totally finished in about 1-1 1/2 hours. Our final result was 16 jars of jam, 7 raspberry and 9 strawberry. One of my favorite things about the jams we made is that they are sugar free too. The sweeteners in them are honey and agave nectar which have a lot less negative health effects then white sugar. AND the recipe called for 3/4 C of honey/agave compared to 3 C of sugar! Great perk, right?!?!
We haven't tasted any of our most recent canning goods because both the pickles and the jam take a couple weeks to really set and get their flavor. So, I"ll be sure to post about them when we've tasted them to let you know how we like them.
Within the next few weeks we'll be doing some of my favorite canning projects: salsa and marinara. They are great money saving options throughout the year too. I'm planning on getting my ingredients at a local farmer's market that lets you fill a gunnysack (large cloth bag) full of the produce you chose for
$10! So, I'll be loading mine up with all the ingredients I need for canning that we don't already have in our garden. I'm excited!
Monday, August 30, 2010


Where's the audience?
This weekend we've had company, so I haven't had much of a chance to update on how things are going, so now I have a growing list of ideas to share with you! :) You'll have to be patient though as I get my life back in order to get them all typed up and posted.
In the meantime, I wanted to share with you about an email I got from my girlfriend from high school who is now living in Africa! I had no idea she had been following along on the blog and it was so great to hear from her. So here's a shout out to living a simple life in Africa!! Thanks for following along.
Well, this got me thinking, who is reading? Where do you live and what's your story. If you've been a casual reader or a frequent follower, please leave a comment and introduce yourself. I'd love to meet you! For extra motivation, I'll be drawing names from those that leave a comment and send out a great selection of coupons for canning supplies that are good through the end of the year.
So lets get started, I'm Chelsea, nice to meet you. And you are? ....
In the meantime, I wanted to share with you about an email I got from my girlfriend from high school who is now living in Africa! I had no idea she had been following along on the blog and it was so great to hear from her. So here's a shout out to living a simple life in Africa!! Thanks for following along.
Well, this got me thinking, who is reading? Where do you live and what's your story. If you've been a casual reader or a frequent follower, please leave a comment and introduce yourself. I'd love to meet you! For extra motivation, I'll be drawing names from those that leave a comment and send out a great selection of coupons for canning supplies that are good through the end of the year.
So lets get started, I'm Chelsea, nice to meet you. And you are? ....
Friday, August 27, 2010
Makeover Update
I figured I should write a short little update on how our money makeover is going. First, of all, the cash budget system is working really well. The thing that has helped us do the best job on it is that I set it up every two weeks (with each paycheck) because then I'm able to make sure we get all the bills paid for before figuring out what we have left to spend on our daily living expenses. Other times that we've tried it we ended up taking the whole month's worth out at a time, but then the paycheck didn't always cover everything else we had to pay for, so it just got stressful and confusing. It's also a little harder to predict my husband's exact income because he's paid an hourly wage, so if he works overtime, does training or anything at all changes in his schedule his check varies too. So, as of now, every two weeks is working much better for us.
The other thing I like about the cash budget is that I feel more in control of the situation. I know how much I can spend, there is a boundary set so all I need to do is stay within it. I'm good at "following the rules" kind of things, so this works for me! :) It has been challenging at times, mainly because it's hard to say no to things we want, when we want them, but that's all part of the process. Some sacrificing has to happen in order to get the result we want.
We did make a large payment on our smallest loan this month, which I blogged about previously. That has given us a good energy boost to keep things moving along. When I figured out the % of our income going to each category today, the way Dave Ramsey does it, we paid 43% of our paycheck this week to debt. Which is awful and exciting at the same time. First it's horrible, because that means we're only living on a little over 50% of our income. How depressing to know we could have that much more going toward things we actually want it to go toward! On the other hand, it means we're doing the best we can to get out of debt as fast as possible too. So, that's exciting!
The other thing I like about the cash budget is that I feel more in control of the situation. I know how much I can spend, there is a boundary set so all I need to do is stay within it. I'm good at "following the rules" kind of things, so this works for me! :) It has been challenging at times, mainly because it's hard to say no to things we want, when we want them, but that's all part of the process. Some sacrificing has to happen in order to get the result we want.
We did make a large payment on our smallest loan this month, which I blogged about previously. That has given us a good energy boost to keep things moving along. When I figured out the % of our income going to each category today, the way Dave Ramsey does it, we paid 43% of our paycheck this week to debt. Which is awful and exciting at the same time. First it's horrible, because that means we're only living on a little over 50% of our income. How depressing to know we could have that much more going toward things we actually want it to go toward! On the other hand, it means we're doing the best we can to get out of debt as fast as possible too. So, that's exciting!
Wednesday, August 25, 2010
Better than Gerber
Who ever thought paying $0.85 per serving of baby food was a good idea? I know it wasn't the parents! If you have or have had kids you know that those baby food jars add up insanely fast, especially if you have a big eater in your house. When our daughter was getting ready for that stage I learned about homemade baby food and figured we'd be trying that first, over the overpriced jars at the store. I know you can make the cereal from scratch too, but I found a store here where I could get that (even organic/all natural ones) for $0.99/box so I just did that.
I found that making baby food is really quite simple and a way to cut a huge expense from your family grocery budget. Due to the seasons my kids were born I was able to get most of my produce for them at farmer's markets or out of our garden, but that doesn't have to be the case. You'll still save a large amount of money even using organic fruits and vegetables from your local grocery stores & even more if you chose to skip the organic ones.
This is what I did. I went to the store and got several things that I wanted to make for baby food. I'd chose things that gave a good variety of nutrition, color and tastes. So my basket usually had the following items in it: a bundle of spinach, a large bag of green beans, a bag of peas, a broccoli, a cauliflower, a butternut squash, a few sweet potatoes, a few avocados and then some fruit like pears, apples, peaches, mangoes, and maybe bananas. Usually I'd spend between $15-25 for all that produce, depending on sales and amounts. I was the "mean" mom that made my kids eat their greens first. So I started with all the bitter greens for my kids. I've heard that avocado is actually an excellent first food nutritionally and it happens to be one of the easiest to make. My reasoning behind the greens first was that if I gave them the things that had a stronger taste first then they'd enjoy the rest as they got sweeter, but would've already been used to the bitter ones and not turned them down every time they were on their plate. I don't know if it really works, there really is no science to it, but neither of my kids have been picky eaters, so maybe it did help.
*To make avocado: peel it, cut it up, put it in a food processor or blender and it's done. If your baby is able to have a few chunks in their food, you could mash it with a fork even. No cooking required! :)
Once we were home I'd get to cooking. Again, this is something you want to allow a decent amount of time for because it's easiest to do a lot of it at once to avoid having to keep getting all your equipment back out. Although, if it works better for you to do a little at a time then that works just as well.
First, I wash, peel, and chop what needs it. Once I have one of the veggies prepped I start steaming it. I've read that steaming is the best method of cooking to maintain nutrients compared to other methods, so that's why I went with that option. While the first batch was steaming, I'd be prepping the next veggie. After the first one was done steaming I'd dump it all into my food processor (you could use a blender too, but the consistency may not be as smooth), add a little bit of purified water and let it do it's thing. Once it was smooth, I'd pour the prepared vegetable into ice cube trays, cover it, label it and put it in the freezer. That was the process I'd use for the next remaining fruit and vegetables until I had either run out of time, produce or ice cube trays.
The following day I'd remove my "veggie cubes" and put them into freezer zip lock bags labeled with the contents and date and store until I was ready to use them. Then I'd finish the rest of what I needed to make. There were times that I'd make it all in one day and store it in sealed containers in the fridge until my ice cube trays were ready and just fill them the next day. Having them frozen in that individual size made meals so easy because I'd take out the number my kids were eating per meal and warm it up, add cereal and it's done. It's also pretty easy to take places because I'd put a few frozen cubes in a sealed bowl and by the time I'd need it it would be thawed or I'd ask for hot water to add to it to make it warm enough for them to eat.
By the way, that one trip to the store would usually get me through 6-8 months of baby food. Of course, I'd occasionally supplement with more bananas or avocados (which I never froze, but probably could have) or adding berries, melons and other items as they were old enough to handle them. You will get A LOT of butternut squash out of one and same with the sweet potatoes, it doesn't take very much. The spinach cooks down the most and will not be a large supply.
A few things to keep in mind. It's important that you wash your food processor between each vegetable because of possible allergens that you may not know about yet. It's also not a bad idea to rinse the water and start fresh in the steamer, though I never got that specific about it.
I did keep some jars on hand for the times that we just needed the convenience of the jar, but I'd found a place here (the same one that sells the cereal for $0.99) that had jars for $0.10/jar and then they went up to $0.35/jar, but still very cheap compared to the regular price at the store.
For me the benefits out weighed the time it took on one or two days to make the food. For starters, I knew what my kids were getting. Everything was fresh produce that had never had any sugars, salts, seasonings or additives added to it. It was only steamed fruit and vegetables. The price was also a huge plus as I mentioned above, the savings are easy to see. Finally, I don't really feel like we lost most of the convenient factor either since the individual frozen cubes were easy to use.
So if you have a baby or have a friend who has a baby ready to embark down the road of food, give them the heads up--making baby food is a great alternative to Gerber!
I found that making baby food is really quite simple and a way to cut a huge expense from your family grocery budget. Due to the seasons my kids were born I was able to get most of my produce for them at farmer's markets or out of our garden, but that doesn't have to be the case. You'll still save a large amount of money even using organic fruits and vegetables from your local grocery stores & even more if you chose to skip the organic ones.
This is what I did. I went to the store and got several things that I wanted to make for baby food. I'd chose things that gave a good variety of nutrition, color and tastes. So my basket usually had the following items in it: a bundle of spinach, a large bag of green beans, a bag of peas, a broccoli, a cauliflower, a butternut squash, a few sweet potatoes, a few avocados and then some fruit like pears, apples, peaches, mangoes, and maybe bananas. Usually I'd spend between $15-25 for all that produce, depending on sales and amounts. I was the "mean" mom that made my kids eat their greens first. So I started with all the bitter greens for my kids. I've heard that avocado is actually an excellent first food nutritionally and it happens to be one of the easiest to make. My reasoning behind the greens first was that if I gave them the things that had a stronger taste first then they'd enjoy the rest as they got sweeter, but would've already been used to the bitter ones and not turned them down every time they were on their plate. I don't know if it really works, there really is no science to it, but neither of my kids have been picky eaters, so maybe it did help.
*To make avocado: peel it, cut it up, put it in a food processor or blender and it's done. If your baby is able to have a few chunks in their food, you could mash it with a fork even. No cooking required! :)
Once we were home I'd get to cooking. Again, this is something you want to allow a decent amount of time for because it's easiest to do a lot of it at once to avoid having to keep getting all your equipment back out. Although, if it works better for you to do a little at a time then that works just as well.
First, I wash, peel, and chop what needs it. Once I have one of the veggies prepped I start steaming it. I've read that steaming is the best method of cooking to maintain nutrients compared to other methods, so that's why I went with that option. While the first batch was steaming, I'd be prepping the next veggie. After the first one was done steaming I'd dump it all into my food processor (you could use a blender too, but the consistency may not be as smooth), add a little bit of purified water and let it do it's thing. Once it was smooth, I'd pour the prepared vegetable into ice cube trays, cover it, label it and put it in the freezer. That was the process I'd use for the next remaining fruit and vegetables until I had either run out of time, produce or ice cube trays.
The following day I'd remove my "veggie cubes" and put them into freezer zip lock bags labeled with the contents and date and store until I was ready to use them. Then I'd finish the rest of what I needed to make. There were times that I'd make it all in one day and store it in sealed containers in the fridge until my ice cube trays were ready and just fill them the next day. Having them frozen in that individual size made meals so easy because I'd take out the number my kids were eating per meal and warm it up, add cereal and it's done. It's also pretty easy to take places because I'd put a few frozen cubes in a sealed bowl and by the time I'd need it it would be thawed or I'd ask for hot water to add to it to make it warm enough for them to eat.
By the way, that one trip to the store would usually get me through 6-8 months of baby food. Of course, I'd occasionally supplement with more bananas or avocados (which I never froze, but probably could have) or adding berries, melons and other items as they were old enough to handle them. You will get A LOT of butternut squash out of one and same with the sweet potatoes, it doesn't take very much. The spinach cooks down the most and will not be a large supply.
A few things to keep in mind. It's important that you wash your food processor between each vegetable because of possible allergens that you may not know about yet. It's also not a bad idea to rinse the water and start fresh in the steamer, though I never got that specific about it.
I did keep some jars on hand for the times that we just needed the convenience of the jar, but I'd found a place here (the same one that sells the cereal for $0.99) that had jars for $0.10/jar and then they went up to $0.35/jar, but still very cheap compared to the regular price at the store.
For me the benefits out weighed the time it took on one or two days to make the food. For starters, I knew what my kids were getting. Everything was fresh produce that had never had any sugars, salts, seasonings or additives added to it. It was only steamed fruit and vegetables. The price was also a huge plus as I mentioned above, the savings are easy to see. Finally, I don't really feel like we lost most of the convenient factor either since the individual frozen cubes were easy to use.
So if you have a baby or have a friend who has a baby ready to embark down the road of food, give them the heads up--making baby food is a great alternative to Gerber!
Monday, August 23, 2010
Canning 101
It's the beginning of canning season for most people with summer produce needing to be used. A few years ago my husband and I decided to start canning from our garden. Our first summer canned salsa and marinara because our tomato plants produced amazingly well that year. My husband had a favorite recipe for marinara from his days of being the assistant chef at an italian restaurant in his home town. So, that's the one we chose to can. We did have to adapt it a little to make sure the acidity levels were right for canning, but that can easily be done by adding lemon juice or vinegar (you can look online for the amounts according to how much you are making). The salsa recipe we just searched for some online and picked one we thought worked well for our taste. During our garage saling days that summer we came across a sale where a lady had canned for YEARS and was getting rid of all her supplies, including her canning bath, tools, jars, extra lids, everything you need. She was selling her things for $1 a box!! AMAZING! So we spent $5 and walked away with everything we needed for that first year. After that first time, we were hooked. Now each summer we can something, usually several things and we've been trying new things each year and have really learned a lot about canning and really enjoy the process, using fresh and home grown produce, having a supply to get us through most of the year and being able to serve something healthy and fresh to our family and guests.
Of course every year we learn something new and have adapted our recipes and methods some to make things more efficient so I thought I'd share some of what we've learned with you. If there are other canners with great ideas, please fill us in too. We're always looking for better ways to do things.
*Give yourself plenty of time. Canning is not an instant project. It's something you'll want to allot a block of time to. For many canners, days/weeks are a more appropriate and realistic time frame because of the amount of recipes and produce they are canning. We usually do ours throughout the season for a day or two at a time. This is not a project you want to start at 7 or 8 o'clock one evening when you have to work the next morning. The prep work is usually the most time consuming. For recipes like salsa and marinara there is a lot of chopping involved so if you have a chopper or food processor those come in really handy. Some of that prep work can also be done the day before if you need to spread thing out over a couple days.
*Have a partner or two is helpful during several stages of the canning process. If you have someone to help you, take them up on that offer!
*Blanching-this is a process that helps preserve nutrients in your produce and is also a method of removing skin from things like tomatoes, peaches, pears, etc. The general idea is that you boil them for a few minutes and immediately put them into ice water. The skin will be cracked and easy to just peel off your with your hands.
*Once you have your ingredients prepped, you are ready to start cooking. Depending on what you're making it could be just a few minutes, but most things need to boiling for a set amount of time to ensure it is safe and healthy and preserved correctly.
*While you are cooking your food you should have your jars and lids boiling in a large pot to sanitize them and prepare them for the food.

* About the time your food is about ready to pour into your jars, you'll need to get your jars out and on the counter with a funnel. Pour your food into your jars allowing for the amount of space required for your recipe. Wipe the lid with a paper towel to make sure there isn't any food interfering with the seal of the lid. Place your lid (that was boiling) on there and lightly screw on the band.
* Processing the food- each recipe requires a certain amount of processing (boiling) time in your pot according to your altitude, size of jars and ingredients. All that can be looked up in your canning recipe or online. It needs to be completely submerged and standing straight up. You'll need a rack or something on the bottom of the pot to keep the jars from touching the bottom of the pan.
*After you have boiled your jars for the amount of time needed you pull them out of the pot using the special tools for grabbing jars. Put them in a place on the counter where they can cool and usually after about 12 hours you can make sure the seal worked (the lid won't pop any more). If it did, you're all done and you can store things for later. If not, you'll have to re-process the jars that didn't seal.

During the cooking and canning, you have several things going on at once which is why a partner is helpful to help make sure you don't miss a step and things are ready when you need them. Some of the more simple canning recipes are fruit and jams. There isn't as much to prep or cook, so if you want to start with something that is less overwhelming that would be my suggestion. You can usually find a jam recipe right on the back of a box of fruit pectin (found in the canning isle, used to preserve fruit and an ingredient in jams).
If you give it a try let me know how it goes! Also, if you have done canning before and have other tips, fill us in on that too.
Of course every year we learn something new and have adapted our recipes and methods some to make things more efficient so I thought I'd share some of what we've learned with you. If there are other canners with great ideas, please fill us in too. We're always looking for better ways to do things.
*Give yourself plenty of time. Canning is not an instant project. It's something you'll want to allot a block of time to. For many canners, days/weeks are a more appropriate and realistic time frame because of the amount of recipes and produce they are canning. We usually do ours throughout the season for a day or two at a time. This is not a project you want to start at 7 or 8 o'clock one evening when you have to work the next morning. The prep work is usually the most time consuming. For recipes like salsa and marinara there is a lot of chopping involved so if you have a chopper or food processor those come in really handy. Some of that prep work can also be done the day before if you need to spread thing out over a couple days.
*Have a partner or two is helpful during several stages of the canning process. If you have someone to help you, take them up on that offer!
*Blanching-this is a process that helps preserve nutrients in your produce and is also a method of removing skin from things like tomatoes, peaches, pears, etc. The general idea is that you boil them for a few minutes and immediately put them into ice water. The skin will be cracked and easy to just peel off your with your hands.
*Once you have your ingredients prepped, you are ready to start cooking. Depending on what you're making it could be just a few minutes, but most things need to boiling for a set amount of time to ensure it is safe and healthy and preserved correctly.
*While you are cooking your food you should have your jars and lids boiling in a large pot to sanitize them and prepare them for the food.

* About the time your food is about ready to pour into your jars, you'll need to get your jars out and on the counter with a funnel. Pour your food into your jars allowing for the amount of space required for your recipe. Wipe the lid with a paper towel to make sure there isn't any food interfering with the seal of the lid. Place your lid (that was boiling) on there and lightly screw on the band.
* Processing the food- each recipe requires a certain amount of processing (boiling) time in your pot according to your altitude, size of jars and ingredients. All that can be looked up in your canning recipe or online. It needs to be completely submerged and standing straight up. You'll need a rack or something on the bottom of the pot to keep the jars from touching the bottom of the pan.
*After you have boiled your jars for the amount of time needed you pull them out of the pot using the special tools for grabbing jars. Put them in a place on the counter where they can cool and usually after about 12 hours you can make sure the seal worked (the lid won't pop any more). If it did, you're all done and you can store things for later. If not, you'll have to re-process the jars that didn't seal.

*I forgot to add the funnel to this picture, you really should have one on hand for canning.
During the cooking and canning, you have several things going on at once which is why a partner is helpful to help make sure you don't miss a step and things are ready when you need them. Some of the more simple canning recipes are fruit and jams. There isn't as much to prep or cook, so if you want to start with something that is less overwhelming that would be my suggestion. You can usually find a jam recipe right on the back of a box of fruit pectin (found in the canning isle, used to preserve fruit and an ingredient in jams).
If you give it a try let me know how it goes! Also, if you have done canning before and have other tips, fill us in on that too.
Sunday, August 22, 2010
Stocking up for winter
This week has felt like a "stocking up" kind of week. On Friday and Saturday I went garage saling for some clothes the kids will need this fall/winter and hit a few jackpots! For just over $20 I think I have most of what they'll need. Some dressier clothes for our son, it seems like he has plenty of every day clothes as handy me downs, but needed some nicer clothes for church, weddings, parties, etc. So, I think I got enough to get him through at least until Christmas present time! ;) For our daughter, I needed pants! I went to put a pair of her pants on from the spring a couple days ago and they were short....all of them. :( I figured I better get them before garage saling season is over, so that was on the list this week. I found her 8 pairs of pants at one sale, $1 each! :) I also got her several pairs of pjs (all princesses of course!), a couple sweatshirts and t-shirts. I'm thinking I may need to get her some more long sleeve shirts as we go through the winter, but there is always plenty of that on clearance throughout the season, and there is also Christmas! ;) For now, I think we're ready for the change of season for both of them, we're all stocked up!
Of course, the kitchen is another place to get stocked up. As I mentioned we had all the apples to use, so I decided to bake apple/cinnamon muffins with some of the pulp (I still have plenty left for another couple baking projects) I had from the juicer. While I was at it I figured I should also use the shredded zucchini I had in the freezer since last summer to use for bread. Then, I got a sweet tooth and figured cookies should also be baked. Yes, crazy, I know! I've always heard of people doing like bulk baking/cooking days and freezing everything and it was always something I had wondered about doing. Well yesterday, I did it. I pulled out all of the baking supplies and went to work. Now our freezer is stocked with 30+ apple muffins, 30+ zucchini muffins, 3 loaves of zucchini bread, 2 frozen batches of cookies (slice and bake kind of idea). Then the pantry has 2 batches of chocolate chip cookie dry ingredient mixes ready to have the liquid ingredients added at a moments notice or the first sign of a snow day to be baked and our counter has a batch of cookies calling us to eat them every time we pass them by! WOW! Of course, never forget the mess these things leave behind too...yes, I have that too. It was nice though to finally use those things that I have had and figured, I'll use them for baking and just never seemed to remember to do it. Now this year, I have them all prepared and at the first thought of company I have breakfast, snacks and dessert covered! The important things, right?
A few things I learned:
1. Don't do this if you aren't a multi-tasker, it requires thinking about a lot of things at once
2. Making similar types of recipes and just doubling/tripling them works better then multiple types of ideas
3. Clean as you go...you'll end up needing those same supplies again anyway, so keep cleaning them.
4. I wish I would've borrowed some bread pans for this project and I could've had more in the oven at a time and been more efficient.
5. Pray that this is the day your kids take long naps and wake up in a good mood! :)
Not that I'm at all ready to see the summer warm days full of playing outside, hanging out by the pool, sitting out on the porch in the evenings, BBQ dinners and suntans go away--but now I'm ready for the change of weather when it inevitably comes. I'm trying to embrace it...
Of course, the kitchen is another place to get stocked up. As I mentioned we had all the apples to use, so I decided to bake apple/cinnamon muffins with some of the pulp (I still have plenty left for another couple baking projects) I had from the juicer. While I was at it I figured I should also use the shredded zucchini I had in the freezer since last summer to use for bread. Then, I got a sweet tooth and figured cookies should also be baked. Yes, crazy, I know! I've always heard of people doing like bulk baking/cooking days and freezing everything and it was always something I had wondered about doing. Well yesterday, I did it. I pulled out all of the baking supplies and went to work. Now our freezer is stocked with 30+ apple muffins, 30+ zucchini muffins, 3 loaves of zucchini bread, 2 frozen batches of cookies (slice and bake kind of idea). Then the pantry has 2 batches of chocolate chip cookie dry ingredient mixes ready to have the liquid ingredients added at a moments notice or the first sign of a snow day to be baked and our counter has a batch of cookies calling us to eat them every time we pass them by! WOW! Of course, never forget the mess these things leave behind too...yes, I have that too. It was nice though to finally use those things that I have had and figured, I'll use them for baking and just never seemed to remember to do it. Now this year, I have them all prepared and at the first thought of company I have breakfast, snacks and dessert covered! The important things, right?
A few things I learned:
1. Don't do this if you aren't a multi-tasker, it requires thinking about a lot of things at once
2. Making similar types of recipes and just doubling/tripling them works better then multiple types of ideas
3. Clean as you go...you'll end up needing those same supplies again anyway, so keep cleaning them.
4. I wish I would've borrowed some bread pans for this project and I could've had more in the oven at a time and been more efficient.
5. Pray that this is the day your kids take long naps and wake up in a good mood! :)
Not that I'm at all ready to see the summer warm days full of playing outside, hanging out by the pool, sitting out on the porch in the evenings, BBQ dinners and suntans go away--but now I'm ready for the change of weather when it inevitably comes. I'm trying to embrace it...
Thursday, August 19, 2010
All things apple
Do you have a supply of large kitchen appliances that take up half your kitchen space and seem to be used just a few times a year? Well, yesterday I put nearly all of them to work! I'm sure today and tomorrow they'll be getting used too.
Yesterday afternoon I spent a lot of time cooking! I had bought a large box of organic apples (I think around 30lbs) for $30 and they were needing to be used. Of course we weren't going to be eating 30lbs of apples in the next couple days, so I made an apple canning list. The thing I love about fruit is that you can make so many great things out of them. This year we decided to make juice (we have a juicer--one of those big appliances I mentioned), apple cider (my husband's idea, which I like), applesauce, apple butter (but that might not make the cut after all), canned apples (for baking cakes, pies, etc). I'll also have all the apple pulp from the juicer to use for baking muffins, breads and cakes frozen for future use. Well, all that meant I had to do some serious amount of cleaning, chopping, cooking, and canning to do.
A few days ago I juiced about 20 or so apples and that juice was in the fridge waiting to be finished or made into apple cider. So yesterday, I dealt with that by draining the chunks and putting it in freezer bags to pull out when we are running low on juice. It's basically the frozen concentrate idea because we'll have to dilute it with some water before using it too. I also juiced about another 20-30 apples, drained it and froze it to make into apple cider maybe today or tomorrow.

After cleaning up that mess and picking out all the "really ready to be used" apples that were still left I got to work on applesauce. How did we ever know how to do things before google? I had no idea how to make homemade applesauce or how to can it, so I did what most people do and googled it. Here is the recipe I found. Basically, you wash and slice your apples, put 1/2 inch of purified water or apple juice in the bottom of a stockpot and boil them until they become really soft.



Yesterday afternoon I spent a lot of time cooking! I had bought a large box of organic apples (I think around 30lbs) for $30 and they were needing to be used. Of course we weren't going to be eating 30lbs of apples in the next couple days, so I made an apple canning list. The thing I love about fruit is that you can make so many great things out of them. This year we decided to make juice (we have a juicer--one of those big appliances I mentioned), apple cider (my husband's idea, which I like), applesauce, apple butter (but that might not make the cut after all), canned apples (for baking cakes, pies, etc). I'll also have all the apple pulp from the juicer to use for baking muffins, breads and cakes frozen for future use. Well, all that meant I had to do some serious amount of cleaning, chopping, cooking, and canning to do.
A few days ago I juiced about 20 or so apples and that juice was in the fridge waiting to be finished or made into apple cider. So yesterday, I dealt with that by draining the chunks and putting it in freezer bags to pull out when we are running low on juice. It's basically the frozen concentrate idea because we'll have to dilute it with some water before using it too. I also juiced about another 20-30 apples, drained it and froze it to make into apple cider maybe today or tomorrow.

This was about the half way point in the box!

This was probably about half the amount I used being washed.

Ready to boil/steam for a while.
After they are cooked you pour your apples into a food processor until it's smooth or the consistency that you like. Pour it back into the pan to keep it warm and add cinnamon to taste. I used one tablespoon and that was perfect for us. That's it, applesauce made. :)

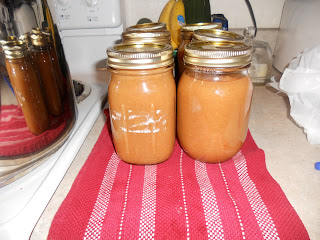
Then, we went through the canning process and now have 6 pints of applesauce for our pantry.

That's a really nice final result from your hard work isn't it? And then there is this...

the mess you made waiting for you at the end! That's my least favorite part, but it'll be worth it to have so many great things on hand that are healthy, free from preservatives, extra sugars/salts, and unnecessary packaging.
Not bad for a box of organic apples, right? So far we have apple pulp for baking at least several baked goods, several jugs of juice, a few jugs of apple cider (almost done), 6 pints of applesauce and another ?? pints of canned apples (still need to finish). The other cool part is that for nearly all of these things, other then some water and some seasonings, I haven't used any other ingredients!
A grocery store scam!
Thanks to Rachael Ray I'm now using my stale bread! Several months ago I watched her cook up some great looking meal (like usual) and while she was cooking she threw out a fantastic tip. (Who says TV isn't good for anything?) Her meal was using stale bread that she had frozen, which in of itself was a great idea. BUT the tip I liked and used today was to use it to make bread crumbs. She basically puts stale bread in the freezer until she has a decent amount stored up and then throws it into the food processor and voila--bread crumbs. Easy, huh? Well, I've been compiling a serious amount of stale bread since then. You know the random hot dog bun that doesn't have a hot dog to marry it, the butt of the bread that only 10% of the world's population enjoys so the rest of us throw it away, the hard & deformed english muffin that got shoved to the back of the fridge. I know you've got them, people! Why not make something useful out of those poor sorry pieces of bread? Anyway, I did and I think it took me a whole 5 minutes to whip up a huge amount of bread crumbs. I grabbed my big bag of random breads that had dried out (watch out that you don't use any with mold on them!), threw a bunch in the food processor, poured it into a ziplock bag, labeled it and DONE!


After doing that today, I saw how easy that was AND how "unwasteful" making your own bread crumbs can be. Then I thought, what a scam! They've been selling us this stuff at the grocery store for years and charging around $2 a tin for stale bread! It's almost as big of scam as bottled tap water. So, there you have it, a really simple way to use something you were going to throw away and save you a few dollars at the check out line. Thank you Rachael Ray! Breaded chicken for dinner anyone?
P.S. I should note to all my local readers: if you need bread crumbs, I'm sharing! :) I have a TON as you can see. Let me know if you want some.
Subscribe to:
Posts (Atom)
